How to set up Zend_Tool on Windows.
A few people we’re having issues installing Zend_Tool on Windows, hell I was having trouble myself since all of the tutorials out there are either Macs or Red Hat based. So dont feel bad if your reading this :-). I thought i would take some time and create a tutorial, from the ground up and learn a few things myself along the way. So here we go!
Step one Installing PHP (if you havent yet)
If you have PHP already installed skip this section and head over to “An overview of the installation”. Eeryone else, head over to the PHP site, php.net and download the latest and greatest. As of this writing the latest Windows installer is php-5.2.9-2 msi. Download the executable. Yea so what I use executable and you should too its easier to install and configure on Windows.
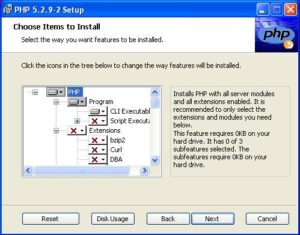
Once the file downloads, double click the installer, click “next” a few times, and stop when you reach the “Choose Items to Install”.
 Choose Items to Install
Once you reach this point your going to check off which extensions you want installed. By default the installer has a few modules turned off but you can easily turn them on by checking off the items to install. Make sure that the “CLI Executable” has no red x marks next to it as shown in the neat picture to the left. If it does click on the “X” and select, “Will be installed on local hard drive”. By doing this your going to installed the php.exe file as well as allow the executable to automatically update and create System Variables. Click “Next”, then “Install” and watch it go.

An overview of the Installation and Required System Variables
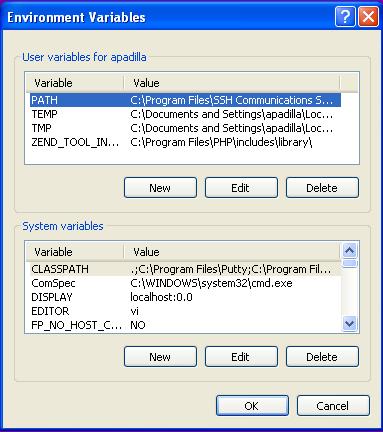
When the installation is done you should have a new directory, C:\Program Files\PHP (if you didnt change the default location). This contains the php.exe file along with a number of other things. You should also have some updates to your environment variables. Open the Environment Variables window by right clicking on “My Computer” , “Properties”, “Advanced”, “Environment Variables” . At the bottom of the window you should have 2 System Variables, “Path” and “PHPRC”. Make sure “Path” contains the “C:\Program Files\PHP\;” (Replace with the location of your PHP directory) and make sure PHPRC contains, “C:\Program Files\PHP\” (Location to your php.ini file) . If all the variables are set click “Ok” and head onto the next section.
Verifying Installation.
Now to check that the installation went smoothly. Open a command line window. You do this by going to “Start”, “Run”, and then typing in “cmd”, then click “Ok”. Once the command line window appears type in: php –version
You should see:

If you do great! Your done with PHP. Let’s install Zend Framework now.
Installing Zend_Tool
If all went well, now its time to install Zend_Tool. Download the latest Zend Framework (latest is 1.8.1) and extract the files somewhere onto your system. Move the files
- bin/zf.php
- bin/zf.bat
into the directory C:\Program Files\PHP and place all the content of the library folder into the C:\zf directory. Many tutorials recommend installing the library in your PHP includes directory but I decided to install it under C:\zf to demonstrate how to use ZEND_TOOL_INCLUDE_PATH environment variable since the library can practically live anywhere when your developing sites. The full path to your Zend Framework instillation is now, C:\zf\library\Zend.
Setting up ZEND_TOOL_INCLUDE_PATH
Open the Environment Variable window again and create a new environment variables under the “System Variables” section. In the “Variable Name” text field enter, “ZEND_TOOL_INCLUDE_PATH” and in the “Variable Value” text field enter “C:\Program Files\PHP\includes\library\” (path to the Zend Library minus the Zend portion). Click ok to close out the “New System Variable” window and then click “ok” once again to close the “Environment Variable” wndow. Time to check if Zend_Tool works.
Verify Installation
If you have any command line windows open, close them and then reopen one. Type in zf show version you should see the below:

Useful commands.
Your set to create your projects , controller, actions now. Below I added a few commands I tend to use.
Create Project
zf create project helloworld
Create a new controller (below commands must be issued within project directory)
zf create controller controller1
zf create controller controller2
Create a few actions
zf create action action1 controller1
zf create action action2 controller2
Thats it!
Armando Padilla
