Zend Framework and JQuery UI – Adding JQuery UI Widgets using ZendX_JQuery.
With the release of the new Zend Framework 1.7.3 a few nuggets were released. One of those nuggets was the extension support for JQuery UI Widgets. Featuring Dialog, Tabs, and Date Selection widgets among other bug fixes. (A full list of updated Zend 1.7.3 release notes can be seen here)
With the release I started to dig into my current projects and started to update my forms. Adding widgets here and there. In the process I learned thing or two and just wanted to share.
Outline
What are we going to cover?
- All required Files and packages.
- Installation of these files and packages
- Examples – Dialog, DatePicker Widgets as well as their API.
- Links to helpful readings
Required Files
If you havent download the latest release, 1.7.3, do so now (click her). Once your done downloading unzip the filea nd open the directory extras/library. This is the directory which contains the ZendX folder.
The latest Zend Framework release comes with an additional library, ZendX. These are extensions which are not part of the Core of the framework. Currently the library contains 2 componenets; the JQuery and the Console components.
Copy the ZendX folder into the folder which contains your current installation of the Zend library. On my webserver the directory structure looks like this after I copy ZenX into the directory . (Yes

You now need the JQuery UI library. To take advantage of the latest and greatest your going to need the release candidate (jquery 1.6rc6), download it and unzip it.
Place the files
- themes
- ui
- external
- jquery-1.3.1.js
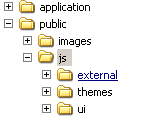
inside your public directory. Your final directory structure should look something similar to this:

Required Files are now installed.
Identifying ZendX_JQuery to your Zend Application
Since the ZendX_JQuery is a View_Helper extension and not part of the main library we need to register it as a plugin using the Zend_View addHelperPath() method.
Open your bootstrap file. public/index.php and copy the below script into it.
$view = new Zend_View();

$view->addHelperPath('ZendX/JQuery/View/Helper', 'ZendX_JQuery_View_Helper');

$viewRenderer = new Zend_Controller_Action_Helper_ViewRenderer();

$viewRenderer->setView($view);

Zend_Controller_Action_HelperBroker::addHelper($viewRenderer);
Adding the information to the bootstrap file will allow you to use the ZendX_JQuery throughout your application. From now on the only item you need to include in your View are the styleSheet to implement using the jQuery() addStylesheet()
method and the jQuery() setUriLocalPath() method in your View.
The addStylesheet method will add the stylesheet. If your setup is identical to one shown above you can use the string “/js/themes/base/ui.all.css” to refernce the css file required. (ZF reference manual mentions flora css, i could not find it)
The setURiLocalPath() will add the js library to use. Set it to “/js/ui/jquery.ui.all.js”.
Well get to see how to use these jQuery methods now.
Putting the pieces together – Examples
Were going to implement 2 quick examples which will get us started on the right foot by implementing a Date-Picker and a Dialog.
Date Picker
The first example demonstrates the use of the View Helper DatePicker.
The full method accepts 4 parameters with the third parameter accepting an array containing options shown here.
datePicker(id, default_value_to_display_in_text_field, params, attributes)
Lets take a look at our View.
jQuery()->addStylesheet(‘/js/themes/base/ui.all.css’);?>
datePicker(“startDate”,
‘Select Your Birth Day’,
array(‘defaultDate’ => ‘+7’,
‘minDate’ => ‘+7’,
‘dateFormat’ => ‘mm-dd-yy’)); ?>
jQuery()->setUiLocalPath(“/js/ui/jquery.ui.all.js”);?>
The example shown above adds the stylesheet between the head node and places the js file at the very end of our HTML. Placing the js at the very end of the body is critical to do. Placing it anywhere else will cause mixed results when executing Ajax features.
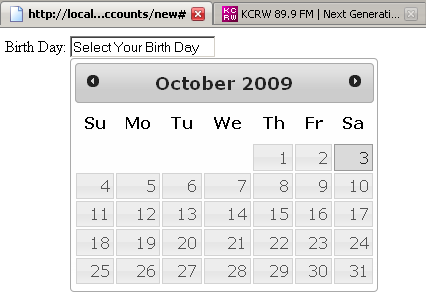
The example above also demonstrates how to format the date for the specific field using one of the parameters. Go ahead and give it a try, you should see something like the below figure.

Dialog Boxes
A dialog box is the Web 2.0 equivalent of the alert() javascript popup. Using the dialogContainer method we can add a dialog box to our page. Below is an example of a dialog box which uses parameters.
If you tried the example in the ZF Reference manual and didn’t have this work for you. Dont worry, change ‘dialog’ to ‘dialogContainer’ and you should be able to get it working.
jQuery()->addStylesheet(‘/js/themes/base/ui.all.css’);?>
dialogContainer(“dialog1”,
‘Welcome to the ZendX_JQuery World!’, array(‘draggable’ => true,
‘modal’ => true,
‘resizable’ => true,
‘title’ => ‘Welcome message’,
‘closeOnEscape’ => true)); ?>
jQuery()->setUiLocalPath(“/js/ui/jquery.ui.all.js”);?>
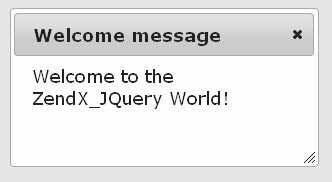
For additional parameters available for the dialogContainer take a look at the JQuery API for the UI widget here. Try out the View, you should see the Dialog window shown below.

Thats it. Set up is done, you know the requirements for the JQuery UI Widgets, and you created 2 widgets. Take a look at some of the links below that helped me get started.
There are a few quarcks i havent figured out yet such as the inability to move the dialog box using FF 3 and currently playnig around with the other widgets so Ill update as I go. Next on the docket. Progress bar and File Uploading using Jquery extension.
Helpful Links
- ZendX_JQuery – Full Refrence Page.
- JQuery UI Home Page
- JQuery Widget API (used for the $param parameter for each JQuery View_Helper Widget)
